Generating reliable object selector using Spy Web utility in Katalon Studio
This article shows you some examples of generating reliable object selectors using Spy Web Utility.
Spy Web Utility provides an intelligent object capturing capability on websites. To learn more about this utility, see Spy Web Utility.
There are two widely used selectors: CSS and XPath. Locators are object attributes that are used to build up XPath or CSS selectors. Locators help find and identify elements on the web page under test.
Based on the selected method, you can edit the Selected Locator to adjust the current selector of an object or manually add a selector using either an XPath or a CSS selector.
With the CSS or XPath mode of the Selection Method, you can further input and edit XPath or CSS objects to identify objects on web UI.
Below are some web element locators:
| Web element locators | Description |
|---|---|
| Id | Select elements with the specified @id attribute. |
| Name | Select the first element with the specified @name attribute. |
| Link text | Select links (anchor tag) element which contains text matching the specified link text. |
| Partial link text | Select links (anchor tag) element which contains text matching the specified partial link text. |
| Tag name | Locate elements using a tag name. |
| Class name | Locate elements using a class name. |
| CSS | Select elements using CSS selectors. |
| XPath | Locate elements using an XPath expression. |
How to find object locators?
You can capture objects, get web element XPath or CSS locators, and manually input XPath or CSS object selectors using Spy Web Utility. Spy Web Utility provides instant feedback by auto-detecting and highlighting all elements that match with the provided selector.
In this section, we will illustrate how to use the Spy Web Utility to find object locators.
-
Open or create a new project. From the main toolbar, click on the Spy Web icon.

The Object Spy window displays.
-
In the URL section, input the URL of the website you want to test. We use our demo page in this example:
http://demoaut.katalon.com/
-
To choose a browser, click on the dropdown icon of the Start button. For this example, we choose a new Chrome browser.

-
Click Start. Katalon Studio opens a new Chrome browser and navigates to the demo website.
-
To capture test objects, first, hover the mouse over them. The focused web object is highlighted in red.
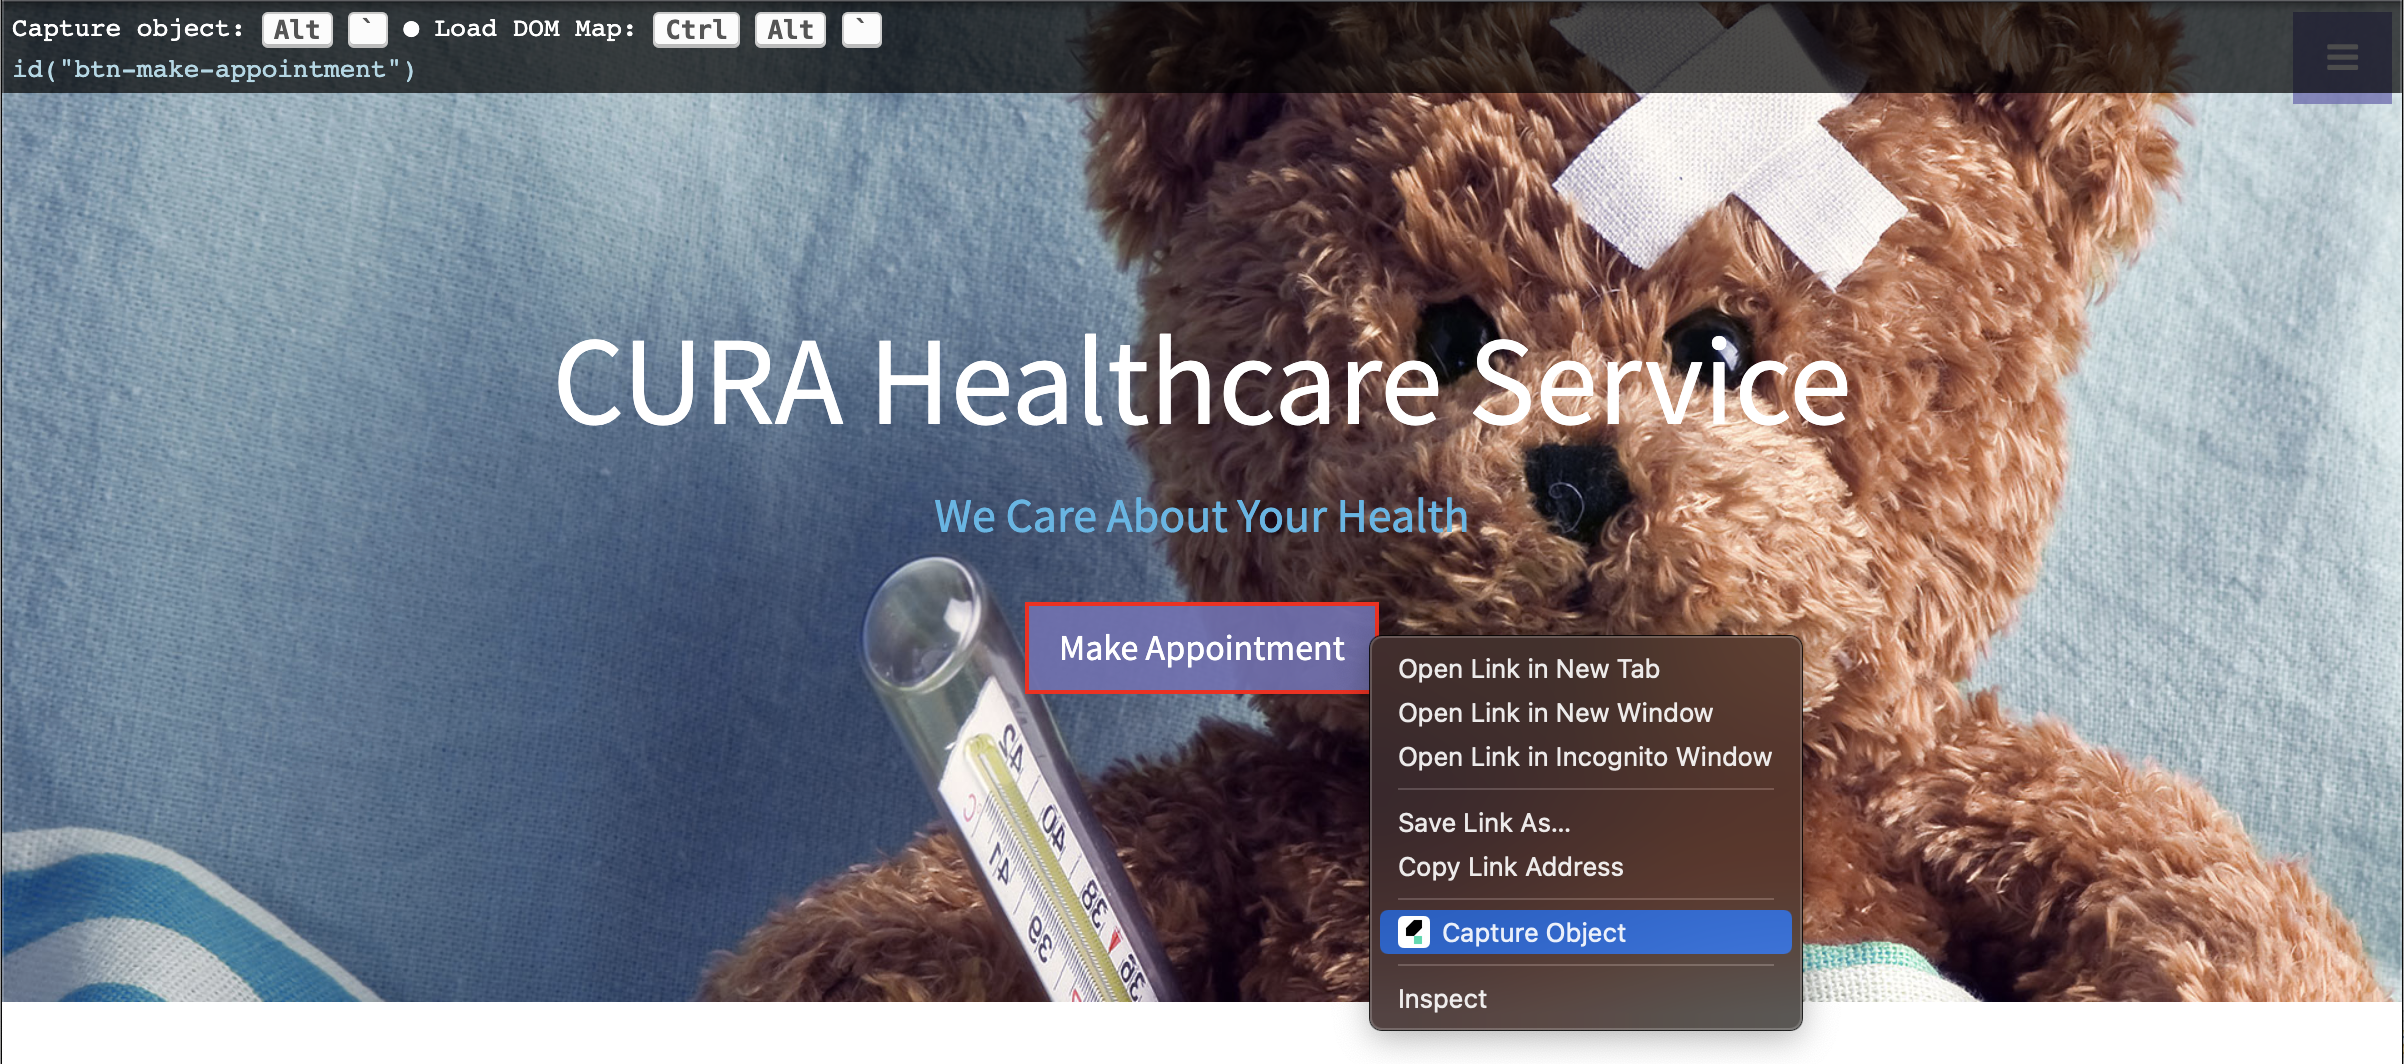
Then, by pressing
\or right-clicking and choosing Capture Object, the focused object is captured and added to the Capture Object list.Katalon Studio automatically captures all available properties of the objects. You can change the folder name and edit the value of any properties.

In the Selection Method section, you can choose XPath, Attributes, CSS, or Image to locate captured objects.
-
In the Selected Locator section, you can manually input your XPath, then click Verify and Highlight. Katalon finds elements that match your XPath locator and highlights them on the web page.
A single locator might identify many elements because a web page can have many elements that use the same formats and styles. The next section will guide you on how to create unique locators to find complex or dynamic elements. See below: Working with XPath selector.
-
To save objects to the Objects Repository, click Save. Then, select a folder to add the captured objects into. Click OK when done.

Working with XPath selector
The following guide shows how to leverage Katalon Studio Spy Web Utility to locate web elements with XPath selector.
These XPath axes methods are used to find complex or dynamic elements.
In the examples below, we are using our demo page: http://demoaut.katalon.com/
You can find our web sample project available to be downloaded here: Katalon Web Automation Sample Project.
Checking Multiple Attributes
You can identify an element with the combination of multiple attributes to build a unique locator. This method is useful when an element has multiple attributes, but using only one attribute cannot create a unique locator.
For example, you can identify the login button with multiple attributes, like @id and @type, to locate the Login button.
XPath:
//*[@id='btn-login'][@type='submit']

Index
Specify a given tag name in terms of the index value you wish to locate. Use this when there are more than one element present in the DOM with similar attributes and it becomes difficult to search them.
For example, you want to locate the first dropdown in a page.
XPath:
//div[@class='form-group']//select[1]

Chained XPath
You can use multiple XPath expressions and chain them.
For example, use the chained XPath to find the calendar icon in the appointment section.
XPath:
//section[@id='appointment']//span[@class='glyphicon glyphicon-calendar']

Contains()
You can use the Contains() method to detect dynamic elements that contain static values.
Example:
Use the Contains() method to find the Login button that contains the id: "btn-login".
XPath:
//button[contains(@id, 'btn-login')]

Last()
Last() is a method used in an XPath expression. It is used to get the very last node.
Example:
There are 3 social icon links, and you want to get the 3rd item by using Last().
XPath:
//ul[@class='list-inline']/li[last()]

Start-with()
The Start-with method finds the element using the starting text of an attribute. This method is useful when the first part of the attribute value is fixed (static), and the rest is dynamic.
Example:
To find the line: "We Care About Your Health", use the Starts-with() method to find the line that starts with "We Care About".
XPath:
//h3[starts-with(text(),'We Care About')]

XPath axes methods
These XPath axes methods are used to find complex or dynamic elements.
-
Following
Selects all elements in the document following the current node( ).
Example:
By using the following method, you can identify the Password text box, which is located after the Username name field.
XPath:
.//*[@id='txt-username']//following::input
-
Ancestor
This method selects all ancestors (parent, grandparent, etc.) of the current node.
Example:
In the screenshot below, you want to get the ancestors of the
ultag highlighted in red.XPath:
//ul[@class='list-inline']/ancestor::div
-
Child
Select all children of the current node.
Example:
Using the child method, you can identify all social links as shown in the below screenshot.
XPath:
//ul[@class='list-inline']/child::li
-
Preceding
Select all nodes that come before the current node.
Example:
Using the preceding method, you can identify all nodes that come before the Login button.
XPath:
//*[@id='btn-login']//preceding::input
-
Following-sibling
Select the following siblings of the context node. Siblings are at the same level as the current node, as shown in the screen below. It finds the element after the current node.
Example:
By using the following-sibling method, you can identify the Password text box, which is located after the Username name field.
XPath:
.//*[@id='txt-username']//following::input