Introduction to Mobile Recorder in Katalon Studio
Mobile Recorder
To start recording a mobile test, click on the Mobile Recorder icon on the main toolbar, and select your device type. Katalon Studio supports local Android or iOS/Remote/Kobiton mobile devices.
![]()
The Mobile Recorder dialog with multiple components appears for your recording sessions.
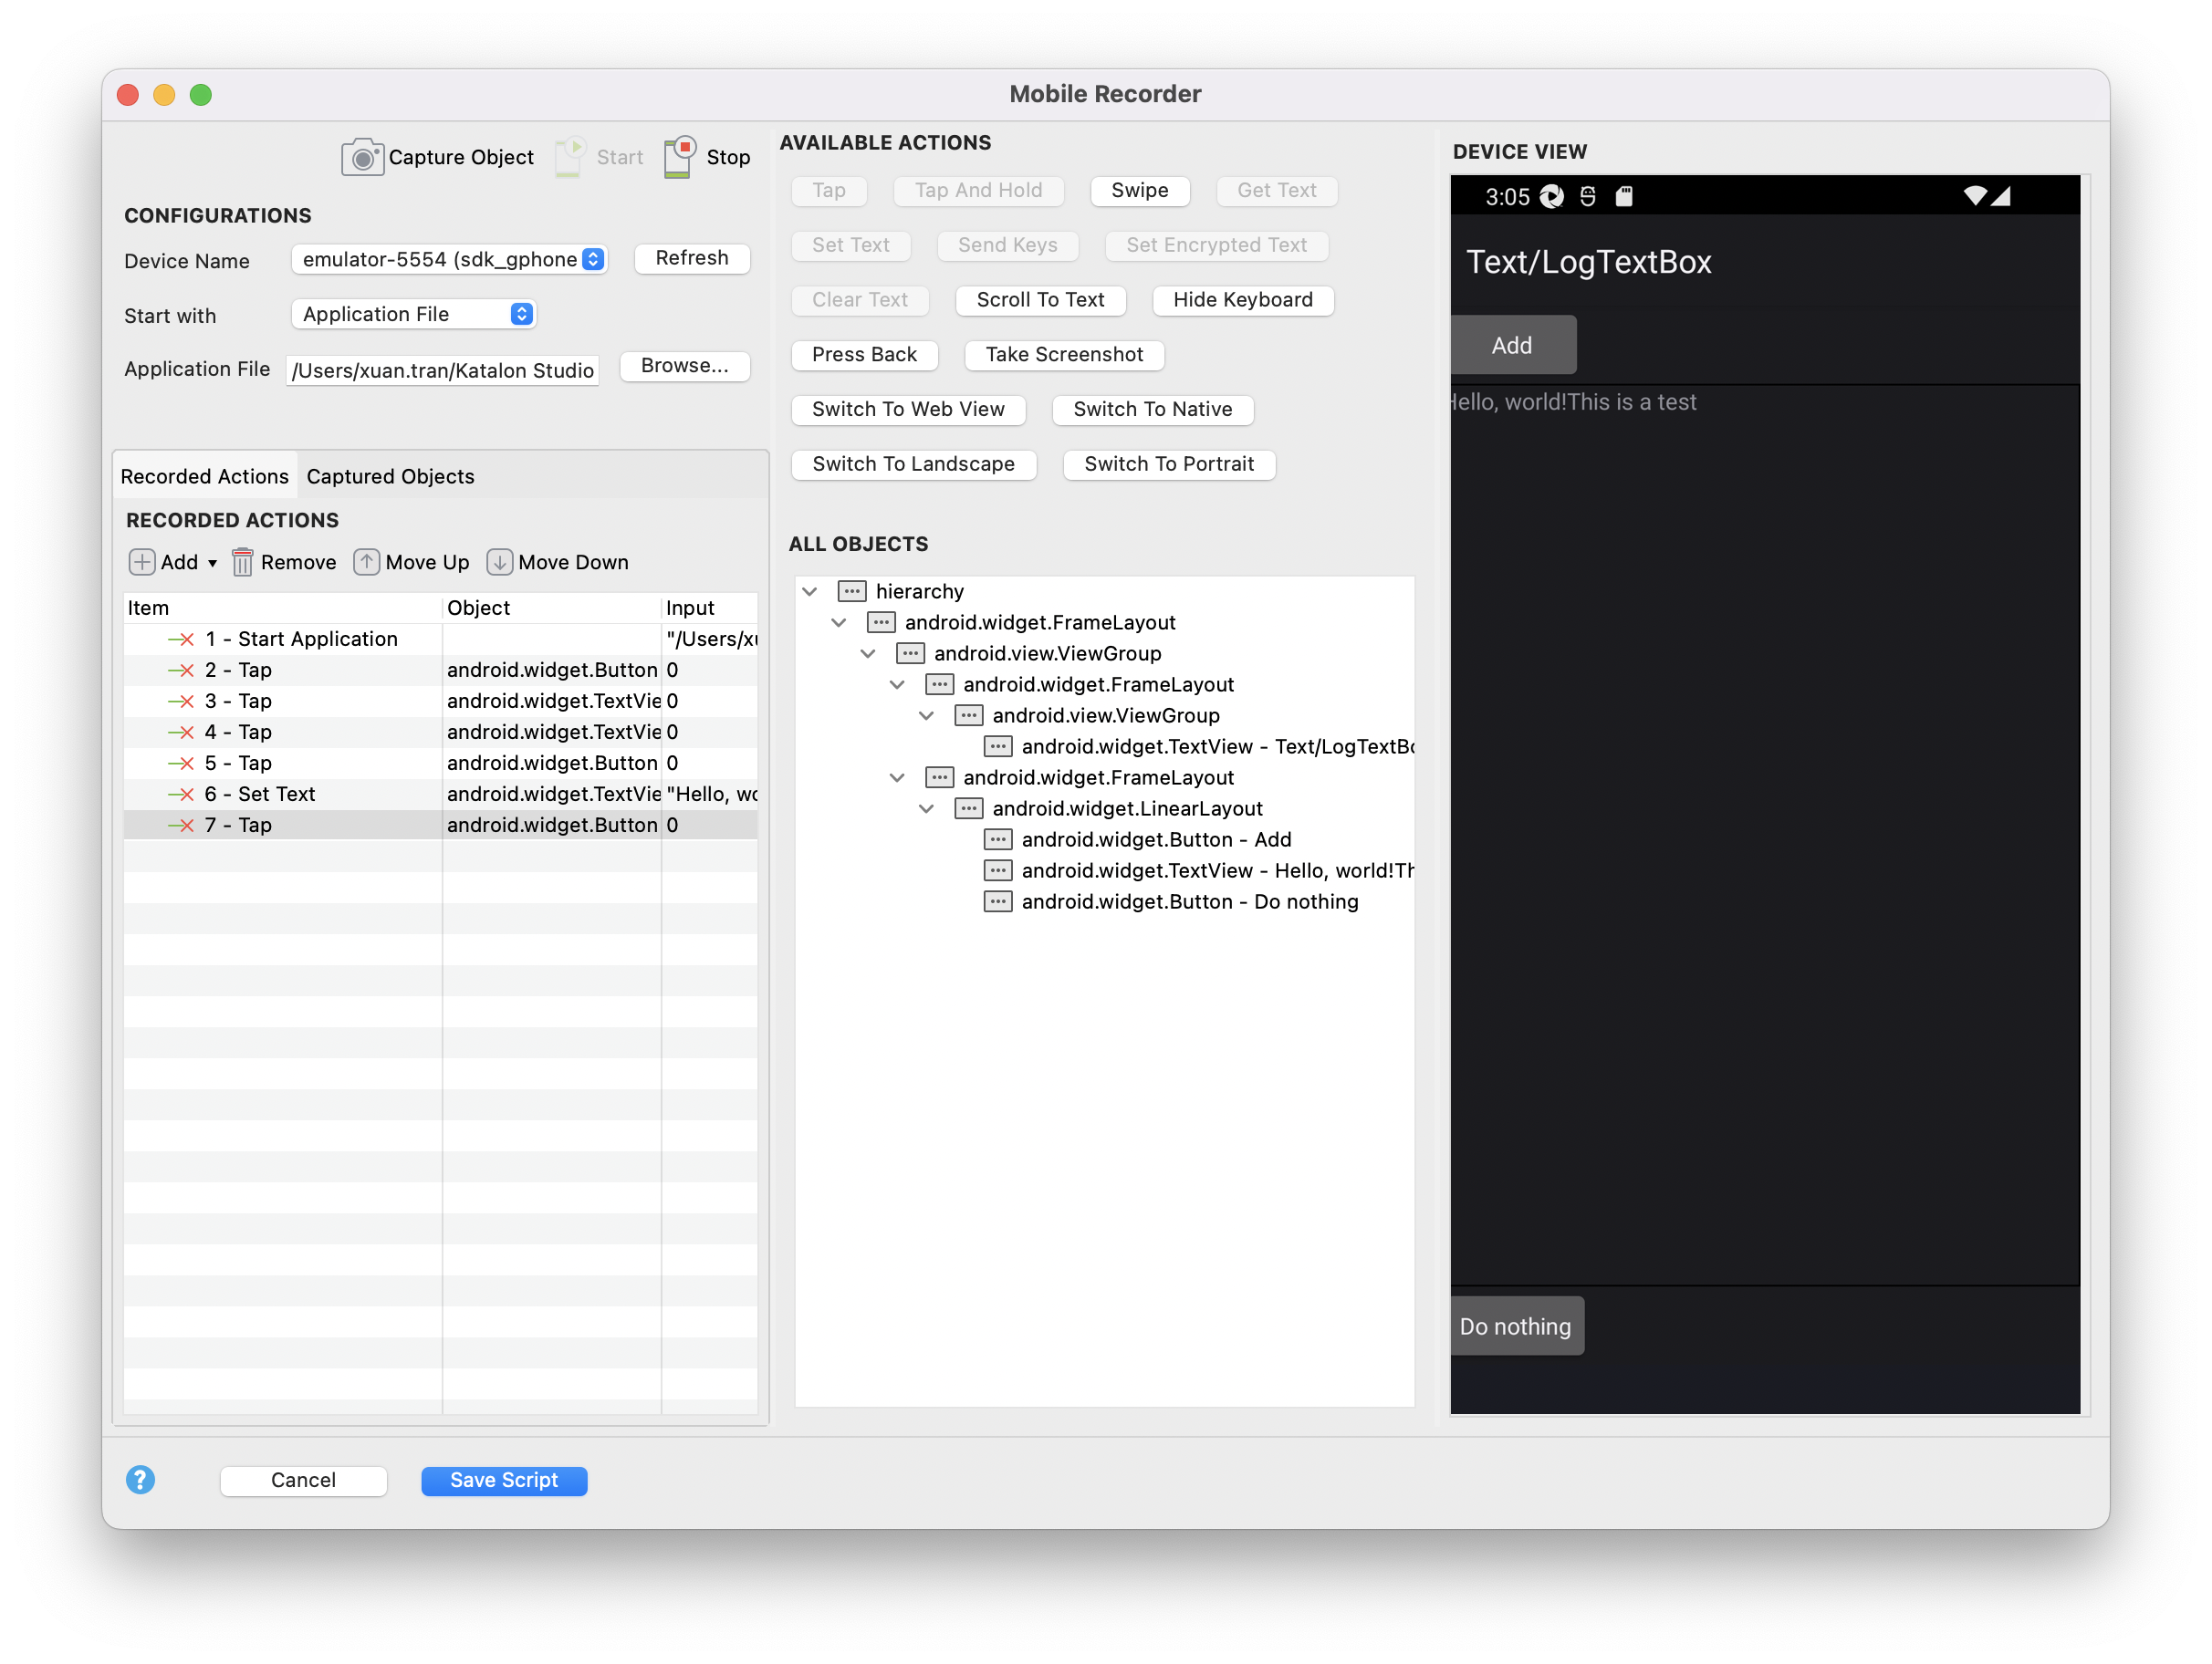
Action Bar
Action Bar located on the top left corner contains the Capture Object, Start, and Stop buttons.

- Capture Object: When you click this button, Katalon Studio captures all mobile elements displayed on the current screen of the device.
- Start: Click on this button to start recording, Katalon will deploy and open the application on the configured device. This button is enabled after you specify the AUT.
- Stop: Click on this button to pause recording.
Configurations
The Configurations area is where you choose a mobile device and application under test (AUT) for the recording session.
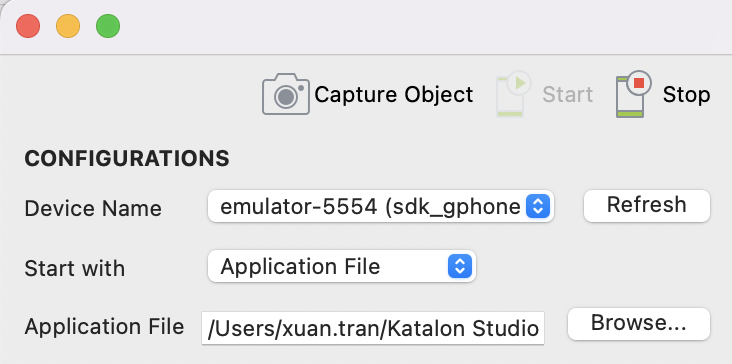
- Device Name: A mobile device where Katalon launches the application (All of your connected devices should be displayed in this list.)
- Start with: In the drop-down list, you can select either Application File or Application ID
- Application File: Browse your tested application (
.apkfile for Android;.ipafile for iOS) - Application ID: Specify the application ID of your tested application, which is either the package name of an Android app or the bundle identifier of an iOS app.
- Application File: Browse your tested application (
Device View and All Objects
To select an object, you can click on any object either in the tree of All Objects or in Device View. Katalon highlights their counterpart accordingly for verification.
- Device View is a simulator of the device screen. You can interact with the AUT in this view.
- All Objects captures and organizes all the displayed mobile objects of Device View in a tree.
To make sure the Device View displays the current screen of the AUT on the device, you can click on the Capture Object button to reload Device View and refresh All Objects.

Available Actions
Available Actions contains multiple buttons representing Mobile actions that can be performed on the AUT. There are two types of Mobile actions, including object action and application action.
- Object action: Object actions require you to select an object on Device View or All Objects to perform the action. Select an object, and you can see which actions are enabled for that object.
Application action: application actions do not require a selected object to perform.

| Available Actions | Description |
|---|---|
| Tap | Tap on a mobile element. |
| Tap And Hold | Tap and hold on a mobile element for a duration. |
| Swipe | Simulate swiping fingers on the mobile device. |
| Get Text | Get the text of a mobile element. |
| Set Text | Set the text on a mobile element. It also clears the previous value of the mobile element. |
| Send Keys (Available from version 8.3.0) | Simulates keystroke events on the specified element, as though you typed the value key-by-key. |
| Set Encrypted Text | Enter an encrypted text in an input field and clear the existing value of the input field. To encrypt a raw text, from the main menu, Help > Encrypt Text. |
| Clear Text | Clear text of a mobile element. |
| Scroll To Text | Scroll to an element which contains the given text. |
| Hide Keyboard | Hide the keyboard if it is showing. |
| Press Back (Available on Android only) | Simulate pressing back button on a mobile device. |
| Take Screenshot (Available from version 8.3.0) | Take a screenshot of the current device screen. |
| Switch To Web View (Available from version 8.3.0) | Switch the current device to web view context. |
| Switch To Native (Available from version 8.3.0) | Switch the current device driver to native context. |
| Switch To Landscape | Switch the current mode of the device to landscape mode. |
| Switch To Portrait | Switch the current mode of the device to portrait mode. |
Validate UI elements
Besides these available actions, from version 8.4.0, you can right-click on any element in Device view or All objects and directly perform the Capture Object action or add Verify and Wait keywords as test steps from the context menu. The selected verification action is recorded in Recorded Actions. You might need to double-click on Input to add necessary values to some keyword.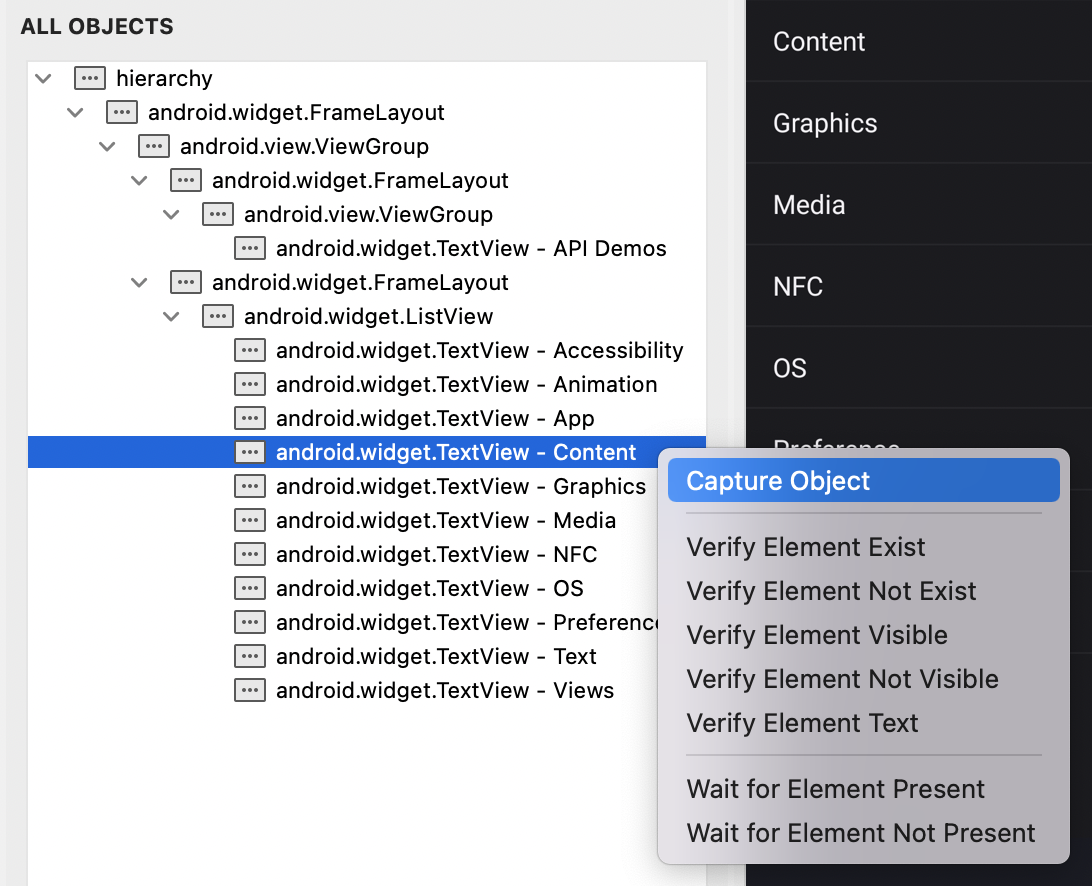
| Option | Description |
|---|---|
| Capture Object | Used for capturing an object. |
| Verify Element Exist | Verify if a mobile element is present. |
| Verify Element Not Exist | Verify if a mobile element is NOT present. |
| Verify Element Visible | Verify if a mobile element is visible. |
| Verify Element Not Visible | Verify if a mobile element is visible. |
| Verify Element Checked | Verify if a mobile element is checked. Applicable to:
|
| Verify Element Not Checked | Verify if a mobile element is not checked. Applicable to:
|
| Verify Element Text | Verify the text of an element. After adding this keyword, you need to get text and parse it in the Input. |
| Wait for Element Present | Wait for the given mobile element to present within the given time (in seconds). |
| Wait for Element Not Present | Wait for the given element to NOT be present within the given time (in seconds). |
Recorded Actions
The Recorded Actions table shows all of the recorded actions and related input/output that you have performed on the AUT. These items later become test steps of your test case.

You can manually add new actions using keywords by clicking on Add, delete unwanted actions by clicking on Remove, or rearrange recorded actions by click on Move Up or Move Down.
Captured Objects
Captured Objects display all objects that you have interacted during the recording session. For each object captured by Katalon, you can find its detailed properties shown in the Object Properties table by double-clicking on it.
The most important property of an object is its locator strategy and value. The default locator is a unique value in detecting that object. Katalon Studio 7.6.0 onwards fully supports selector strategies supported by Appium except for Android Data Matcher. To learn more, see Find Mobile Objects.
If you prefer another locator strategy among the provided option, you can choose it and generate a new locator. Then click Highlight to see if your newly updated locator can detect the target object correctly.
Default locator is unique in detecting that object:

You can always choose your preferred locator strategy among the provided options:

Remember to verify if your newly created locator can identify the target object:

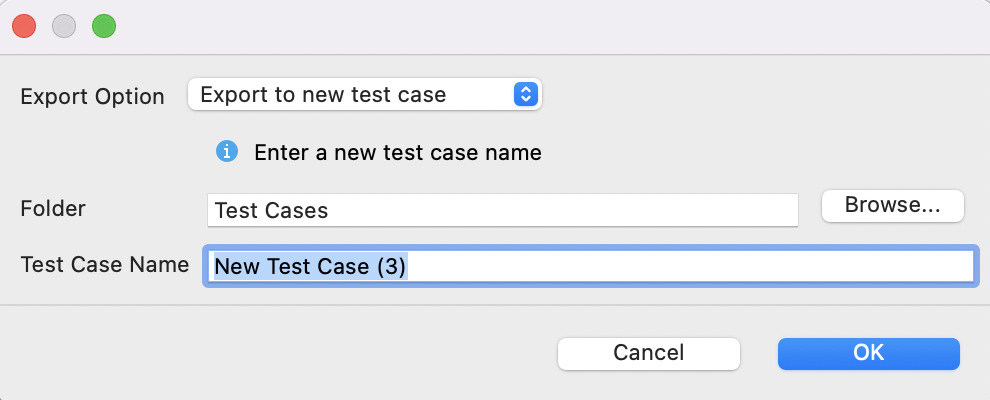
Export recorded actions to a test case
When you finish a recording session, click Save Script. The Folder Browser dialog pops up asking you where to store recently captured objects.
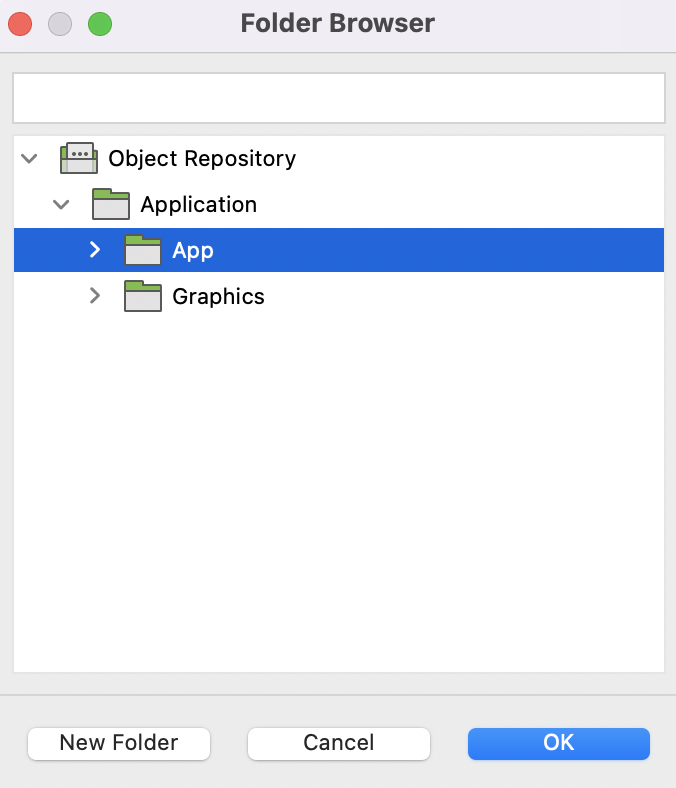
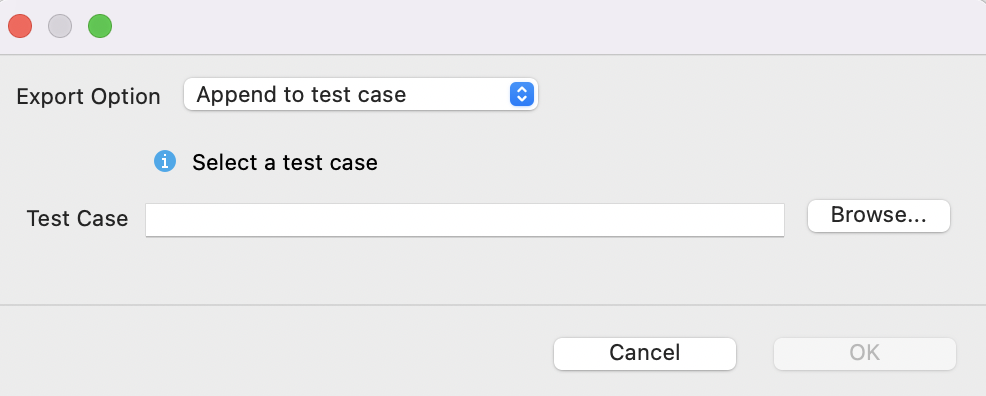
There are 3 options to export the recorded actions to a test case:
- Export to new test case (chosen by default)
- Append to test case
Overwrite test case

See also: